Friday, August 29, 2014

Magnet Clasps - Where to buy them cheaply


I've updated this information in a new post which you can read HERE.
 

Thursday, August 28, 2014

Bracelet & Earrings Set - Flutter & Marquesa

FLUTTER BRACELET
  • 11/0 seed beads Miyuki "Dark Bronze" (11-457D)
  • 8/0 seed beads Miyuki "Dark Bronze" (8-457D)
  • SuperDuo beads "Pearl Coat Brown Sugar"
  • 4mm bicones "Greige - #C24" (Beads One)
  • 3mm druks "Bronze"
  • 4mm druks "Bronze"
MARQUESA EARRINGS
  • 11/0 seed beads Miyuki "Dark Bronze" (11-457D)
  • 8/0 seed beads Miyuki "Dark Bronze" (8-457D)
  • 14mm rivolis "Greige"
  • SuperDuo beads "Pearl Coat Brown Sugar"
  • 4mm druks "Bronze"

Here is one last "Marquesa" set. This time I decided to make one of Deborah Roberti's bracelet patterns that I hadn't tried yet. Her "Flutter Bracelet" has just the right combination of beads to work with the colors I used in the earrings. It has SuperDuos and you can use any combination of 3mm and 4mm beads such as druks, bicones or fire polished, etc. I just happen to have some 4mm bicones about the same color as the rivolis that I used in the earrings so I used those as the base color. However, I thought the gray seemed a bit drab so I replaced the 4mm beads that are in the in between motifs with 4mm bronze druks. If you'd like to make yours the way I made mine, the 4mm "Color 2" beads are added in STEPS 24 and 25 and they're the first 4mm beads added in those two steps. I used the gray bicones for the other 4mm beads added at the end of those two steps. I did use the bicones in those places on the very ends of the bracelet because I had already made the first motif before I realized that I didn't want to use bicones there. I think that looks fine though because of the way that the bracelet tapers off on the ends.


I changed the way the clasp is attached to the bracelet by using an 8/0 seed bead as the third seed bead picked up in STEP 30 of Deb's pattern. When I went back around to reinforce the loop, I skipped the 8/0 bead to make it pop out.

You can buy the "Marquesa Earrings" pattern HERE and the "Flutter Bracelet" pattern HERE.

P.S. - After writing this post, I realized that the purple "Marquesa" earrings that I posted yesterday go very well with the top that I have on today. So, I will probably make one more set once I decide which bracelet pattern to make. I might use Deb's "Harmony Band" pattern this time if I've got two SuperDuo colors that will go well together and match the colors in my top.

UPDATE: As requested, here is a list of where I bought the beads that I used in this set:
11/0 seed beads Miyuki "Dark Bronze" (11-457D) - Charlene's Beads
8/0 seed beads Miyuki "Dark Bronze" (8-457D) - Charlene's Beads

SuperDuo beads "Pearl Coat Brown Sugar" - Mountain Shadow Design Etsy. This color is almost identical to "Pastel Light Brown Coco" from Red Panda 

4mm bicones "Greige" (#C24) - Beads One

3mm druks "Bronze" - Artbeads.com

4mm druks "Bronze" - Aura Crystals  OR Artbeads.com

14mm rivolis "Greige" - Aura Crystals 


Wednesday, August 27, 2014

Bracelet & Earrings Set - Duo Bobble Band & Marquesa Earrings


DUO BOBBLE BAND (LIZBETH BAND)
  • 11/0 seed beads Miyuki "Dark Bronze" (11-457D)
  • SuperDuo beads "Metallic Suede Teal"
  • 3mm druks "Jet"


MARQUESA EARRINGS
  • 11/0 seed beads Miyuki "Dark Bronze" (11-457D)
  • 8/0 seed beads Miyuki "Dark Bronze" (8-457D)
  • 14mm rivolis "Jet"
  • SuperDuo beads "Metallic Suede Teal"
  • 4mm druks "Bronze"

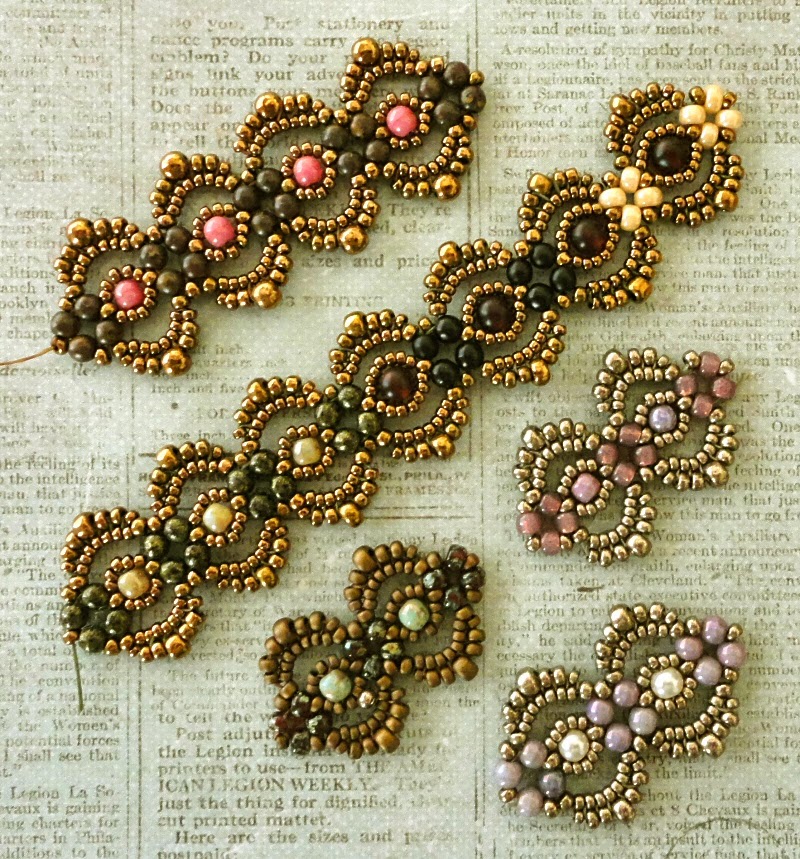
I used black druks in the bracelet to complement the opaque "Jet" rivolis in the earrings. The plain black rivolis aren't nearly as pretty as the crystal ones but I like that they go well with a lot of bead colors. Angie Martin's "Marquesa Earrings" pattern is for sale HERE on Etsy. I made the bracelet using my friend Teejay's wonderful "Duo Bobble Band" pattern. This pattern is not available for download or sale.


UPDATE 1/24/18: A free pattern is now available and the new name for this pattern is "Lizbeth Band". Visit THIS post to download the free pattern.
 
I've got one more set to make but here are two more earring samples that I probably won't make bracelets to go with:


  • 11/0 seed beads Miyuki "Dark Bronze" (11-457D)
  • 8/0 seed beads Miyuki "Dark Bronze" (8-457D)
  • 14mm rivolis "Amethyst"
  • SuperDuo beads "Pastel Bordeaux"
  • 4mm druks "Bronze"


  • 11/0 seed beads Miyuki "Dark Bronze" (11-457D)
  • 8/0 seed beads Miyuki "Dark Bronze" (8-457D)
  • 14mm rivolis "Light Amethyst"
  • SuperDuo beads "Pastel Burgundy"
  • 4mm druks "Bronze"


Tuesday, August 26, 2014

Bracelet & Earrings Set - India & Marquesa

INDIA BRACELET
  • 11/0 seed beads Miyuki "Dark Bronze" (11-457D)
  • 3mm druks "Bronze"
  • 4mm rondelles "Champagne - #C26 AB" (Beads One)
  • SuperDuo beads "Opaque Rose Gold Topaz Luster"

This is the second set that I've made so far combining a pair of Marquesa Earrings with a complementary bracelet. I used the "India" pattern for the bracelet. You can buy the pattern HERE and the Marquesa pattern is for sale HERE. I just happened to have some rondelles in a color almost identical to the "Golden Shadow" rivolis that I used in the earrings. For some reason I had never thought of using yellowish beads with those SuperDuos before but they really work well together. The only thing I'm not keen on is how the thread shows through the rondelles. It's a lot more obvious in the photos though than on my wrist.


MARQUESA EARRINGS
  • 11/0 seed beads Miyuki "Dark Bronze" (11-457D)
  • 8/0 seed beads Miyuki "Dark Bronze" (8-457D)
  • 14mm rivolis "Golden Shadow"
  • SuperDuo beads "Opaque Rose Gold Topaz Luster"
  • 4mm druks "Bronze"


Monday, August 25, 2014

Marquesa Earrings: Suede Gold and Seal

MARQUESA EARRINGS
  • 11/0 seed beads Miyuki Dark Bronze (11-457D)
  • 8/0 seed beads Miyuki Dark Bronze (8-457D)
  • 12mm rivolis "Seal" (vintage color)
  • SuperDuos "Metallic Suede Gold"
  • 4mm druks "Bronze"

I finally made my first complete pair of "Marquesa Earrings" using Angie Martin's pattern which you can buy from Nanny Pink's Passion Etsy shop HERE. I started with this color combination because I love it and it seems to be the most popular combo on my Pinterest board. As you can see, I added the extra embellishments to help keep the rivolis in place because they're actually too small for the bezel. The pattern actually calls for 14mm rivolis.

My plan is to make bracelets to go with all of the Marquesa earrings that I've been making. I'll post about them as soon as I complete the sets but I just happened to already have a bracelet that goes very well with today's earrings. The bracelet is Sam Wescott's "SuperDuo Rosette Bracelet" pattern which you can buy HERE. You can get the details for the bracelet from my May 20th post HERE.

Although I love the look of the "suede" SuperDuo beads but I had a bit of a problem with them. After making a bunch of sample earrings, I had to take them apart. Somehow during the process of taking them apart, the suede SuperDuos ended up with ugly scratches on quite a few of them. Even when I tried to be very careful with my scissors, I was unable to avoid scratching them. I thought about editing them out of the photo but I decided to leave them as is so that you can see what I'm talking about. You may need to view the photos at full size to see the scratches. At least the scratches aren't nearly as obvious at actual size in real life.


Friday, August 22, 2014

Pattern Review: Marquesa Earrings

The "Marquesa Earrings" pattern is by Angie Martin of Nanny Pink's Passion on Etsy.  The pattern can be found on THIS page.

I haven't made a final pair of earrings yet but I did made quite a few samples in different colors. With the pattern, you'll create a pretty bezel for a 14mm rivoli stone. The earrings are about 1 1/4 inches long and almost an inch wide. They're not tiny by any means, but they're not huge either. I like the size of them but they are a little bit heavy due to the weight of the rivoli stones. I love the earrings but I did discover that not all SuperDuo beads work well with the design. It works best with SuperDuos that aren't too fat and glossy and are more thin and tapered. As you'll see below, I had trouble with some bronze luster SuperDuos and the bezel didn't turn out quite right. All of the other kinds that I used worked perfectly.

The tutorial includes clear, large photos of each step. This is great but it does create a problem. Unless you can follow the tutorial on a tablet computer or a laptop, you'll have to print out 25 pages of instructions. It was relatively easy to follow the tutorial once I understood what the instructions were saying to do in some of the steps. I like these earrings so well that I've ordered some more 14mm rivolis so that I can make more color combinations. I was limited to just some red and some amethyst stones for my samples.


For my first sample below, I made the loop at the top for the wire as directed by the pattern. As you'll see in the rest of my samples, I've tweaked the loop so that I can connect my wires with jump rings. All I did was replace the center seed bead called for in the instructions with an 8/0 seed bead instead of an 11/0 bead. The loops on some of my earring wires were a little too small to fit easily around the seed beads of the earring loop. I quite like this color combination.


  • 11/0 seed beads Miyuki "Dark Bronze" (11-457D)
  • 8/0 seed beads Miyuki "Dark Bronze" (8-457D)
  • 14mm rivoli "Amethyst"
  • 4mm druks "Bronze"
  • SuperDuo beads "Pastel Cream"

The next earring is the one that gave me some trouble. The SuperDuo beads were too fat so I had a hard time getting the bezel closed around the rivoli. It kept popping back out and the stitching was too loose. I did eventually get the bezel closed but you can see that the opening around the stone is a bit too wide compared to my other samples. The opening is much too loose, but you can't see that in the photo.


  • 11/0 seed beads Miyuki "Dark Bronze" (11-457D)
  • 8/0 seed beads Miyuki "Dark Bronze" (8-457D)
  • 14mm rivoli "Amethyst"
  • 4mm druks "Amethyst"
  • SuperDuo beads "Crystal Gold Luster"

This one is one of my favorites. I used red and green but I don't think it looks too Christmasy. Everything worked perfectly in this sample.


  • 11/0 seed beads Miyuki "Dark Bronze" (11-457D)
  • 8/0 seed beads Miyuki "Dark Bronze" (8-457D)
  • 14mm rivoli "Red"
  • 4mm druks "Bronze"
  • SuperDuo beads "Red Dark Travertin"

This one also came out a little loose but not as bad as the bronze one above. I'm not sure what caused it with this one because the SuperDuos have a almost a matte finish. This isn't one of my favorites because I think that the pearls are too bright and stand out too much.


  • 11/0 seed beads Miyuki "Dark Bronze" (11-457D)
  • 8/0 seed beads Miyuki "Dark Bronze" (8-457D)
  • 14mm rivoli "Red"
  • 4mm pearls "Beige" (Beads One)
  • SuperDuo beads "Crystal Bronze Pale Gold"

I like this one because none of the bead colors stand out too much and there's enough "metal" to make them look like real jewelry.


  • 11/0 seed beads Miyuki "Dark Bronze" (11-457D)
  • 8/0 seed beads Miyuki "Dark Bronze" (8-457D)
  • 14mm rivoli "Amethyst"
  • 4mm druks "Bronze"
  • SuperDuo beads "Jet Bronze Picasso"

I tried something a little different with the last two samples. I was getting tired of working with red and amethyst rivolis so I thought I'd see if I could get the pattern to work with 12mm ones. In the first sample below, I added a faux "prong" of three seed beads at the top of the bezel to help hold the stone in place. That did help but the bottom has a huge ugly gap. I do love the colors of this one though so I might make a pair like this but with the tweak that I added to the last sample.


  • 11/0 seed beads Miyuki "Dark Bronze" (11-457D)
  • 8/0 seed beads Miyuki "Dark Bronze" (8-457D)
  • 12mm rivoli "Seal"
  • 4mm druks "Bronze"
  • SuperDuo beads "Metallic Suede Gold"

I don't like the earring below quite as well as the previous one but I solved the problem of the stone not fitting right at the top and bottom of the bezel. The bezel is very secure and there are no gaps around the rivoli. The only drawback is that the stone doesn't show very much with the extra seed beads above and below it. I haven't decided yet if I really like the look of it. Those seed beads around the stone make it look a little busy. What do you think of it?


  • 11/0 seed beads Miyuki "Dark Bronze" (11-457D)
  • 8/0 seed beads Miyuki "Dark Bronze" (8-457D)
  • 12mm rivoli "Seal"
  • 4mm druks "Bronze"
  • SuperDuo beads "Blue Turquoise Bronze Picasso"


Thursday, August 21, 2014

Bracelet of the Day: Celtic Bracelet

CELTIC BRACELET
  • 15/0 seed beads Miyuki "Dark Bronze" (457)
  • 4mm pearls "Antique Brass" (Chinese)
  • 4mm bicones "Denim Blue" (Walmart - no longer available)

Today's bracelet of the day is doubling as a review of a pattern by Juanita Carlos of Jaycee Patterns.  It's available HERE on her website and also on Etsy HERE


I followed the pattern as directed but I left off the little dangles and I changed the clasp loops. Of course you knew that I would do that, didn't you? Juanita doesn't mention this but I recommend that you use fine thread such as FireLine or Nymo B with this pattern because you will have to go through some of those tiny 15/0 seed beads a few times. In fact, I actually went around them a second time after each step to reinforce them. 

I love the pretty "Celtic" design between the pearl motifs. The bracelet is quite delicate and comes out about 1/2" wide. It's not too difficult to figure out the thread path from the diagrams and you'll be done with the whole bracelet by the time you've memorized the steps because you'll probably only need to make three or four motifs. My 5 3/4" bracelet has just three motifs but a medium to large size bracelet would probably need four. Because the motifs are so large, you may need to use one less than you think you might need and adjust the length with a longer clasp loop and more jump rings to attach the clasp. Or you could make a homemade clasp and loop as directed by the pattern. You do need to start and end the bracelet with the pearl motif.

Before I settled on the blue and bronze color scheme for my bracelet, I made a few samples with some pretty "Fruit Jade" bicones that I ordered from China. The eBay shop sells 100 bicones in 3mm and 4mm for only 99-cents and the shipping is free. Click HERE for the eBay shop where I got them. In the end, I wasn't happy with any of the seed bead colors that I tried with those bicones so I'll use them for a different project. I thought you might like to see my experiments though so here are some photos:


For the first sample, I used dark bronze seed beads with the jade bicones. I think I like that the best of the four colors that I tried but I liked the blue much better. I think that there is a little too much contrast between the dark seed beads and the pale bicones. I prefer the blue and bronze combination because the color tone of the seed beads and the bicones is almost the same. The design "flows" better that way, I think.


In those three samples, I tried another shade of bronze and two different "silver" colors. I wasn't keen on any of those with the green. Again, too much contrast between the bronze and jade and the silver ones just look washed out. I also tried different round beads in the second sample. Here are the beads that I used in all of the jade samples:

JADE & DARK BRONZE:


  • 15/0 seed beads Miyuki "Dark Bronze" (457)
  • 4mm bicones "Fruit Jade" (Chinese)
  • 4mm round stone beads "Sandjet" (Chinese)

JADE & LIGHT BRONZE:

  • 15/0 seed beads Miyuki "Light Bronze" (457L)
  • 4mm bicones "Fruit Jade" (from China)
  • 4mm druks "Jet Picasso"

JADE & PEWTER:

  • 15/0 seed beads Miyuki "Duracoat Galvanized Pewter" (4222)
  • 4mm bicones "Fruit Jade" (from China)
  • 4mm druks "Jet Picasso"

JADE & SILVER:

  • 15/0 seed beads Miyuki "Duracoat Galvanized Light Pewter" (4221)
  • 4mm bicones "Fruit Jade" (from China)
  • 4mm druks "Jet Picasso"


Wednesday, August 13, 2014

Bracelet of the Day: Lovely Lace - Amethyst Luster & Pewter


LOVELY LACE BRACELET
  • 15/0 seed beads Miyuki Duracoat Galvanized "Pewter" (D4222)
  • 11/0 seed beads Miyuki Duracoat Galvanized "Pewter" (D4222)
  • 8/0 seed beads Miyuki Duracoat Galvanized "Pewter" (D4222)
  • 3mm pearls "Ivory" (#10 - Beads One)
  • 3mm druks "Opaque Amethyst Luster"

I'm pretty sure that Jane Austen, or any Regency lady, would have been pleased to own this beautiful bracelet. This time I used 8/0 seed beads in the lace edging instead of druks. See yesterday's post, HERE, if you'd like to download the free tutorial.


Tuesday, August 12, 2014

Free Beading Tutorial: Lovely Lace Bracelet


The tutorial is finally finished and I made a bracelet so that I could add a photo. This beautiful pattern was created by my dear friend, Teejay. She sent me a rough outline of the steps along with some helpful photos. I gave it a run-through and then I typed up the final draft of the tutorial and made the graphic illustrations. It was a fun collaboration and I hope that you like the pattern as much as I do.

As I mentioned the other day, you can make the bracelet with either 3mm druks or 8/0 seed beads in the connector motifs and on the lace edging. For the centers of the "flower" motifs, you can use either 3mm or 4mm druks or other round beads. For the bracelet in the photo, I used 3mm druks in all three places. However, I made another bracelet with 8/0 seed beads on the edging and I will post that one on Wednesday as my Bracelet of the Day.

The pattern uses a LOT of thread and you will definitely have to add more at some point. I don't recommend using more than 3 yards at a time or the thread gets too ragged. You'll need about 3 yards of thread for about a 12-inch tail and the first 6 motifs. After adding another 3 yards of thread, I had plenty to make the remaining 5 motifs, attach the other end of the clasp and weave in the end. I probably had enough thread left over for another couple of motifs. My bracelet is 5 3/4-inches long and has 11 motifs. For a bracelet longer than about 13 motifs, you may need to add thread twice. I used Nymo thread so it's possible that you could get away with 4-yard lengths of FireLine.

I like to use magnet clasps when I can but I've given two clasp loop options so that you can attach a clasp with jump rings, if you like. The instructions for both methods are at the end of the tutorial and here is a sample photo showing two types of clasps:


These are the supplies that I used in today's bracelet:

  • 15/0 seed beads Miyuki "Dark Bronze" (15-457D)
  • 11/0 seed beads Miyuki "Dark Bronze" (11-457D)
  • 8/0 seed beads Miyuki "Dark Bronze" (8-457D)
  • 3mm druks "Champagne" (Nirvana Beads)
  • 3mm druks "Bronze Antique" (Nirvana Beads)

Click HERE to download the free pattern.


If you like this pattern, please consider making a voluntary donation through PayPal using the DONATE button on the right.

NOTE: I don't mind if you sell the projects that you make with our patterns, but please mention that you got the pattern from Linda's Crafty Inspirations.Please contact me for information about teaching this or any of our patterns in a class.


Sunday, August 10, 2014

Czech Pressed Glass Druks - Where to buy them

3MM DRUKS

I've compiled a list of online shops that sell druks or have sold them in the past. Some shops only have a couple of sizes and colors and they come and go so quickly, especially on Etsy, that I can't promise that all of these links are still good or that they've still got any druks in stock. Also bear in mind that most shops only sell druks in 4mm or larger sizes.

All of the photos in this post are 3mm druks or other 3mm round beads that I have in my stash. So, you can see that they can be found with a little time, effort and money, of course.

3MM DRUKS
Bobbie This n That

All Things Beaded

Artful Bead Studio Etsy

Simply Pie Etsy

South Pass Beads Etsy

Arte Bella Surplus Etsy

Laser Beads Etsy

Supply Emporium Etsy

Czech La Vie Etsy

Blackrock Beads Etsy

Vintage Beadery Etsy

The Beads Bungalo Etsy

A Day at the Beach 2 Etsy

Supplied By Lightness Etsy

Beadaholique (only 4mm and larger druks)

Aura Crystals (only 4mm and larger druks)

Red Panda (Betsy sells 3mm druks)

Robin's Beads UK (lots of nice 3mm druks)

ArtBeads (pretty good selection of 3mm druks)

Aria Design Studio Etsy

Fusion Beads

Fire Mountain Gems and Beads

Goody Beads

Harlequin Beads

Shipwreck Beads

Simply Beads

Paradise Beads 4 U Etsy

MK Supplies Etsy

Silver Lining Beads Etsy

The Red Bead Boutique

BeaDiverse UK


Smitten Beads UK

Perles & Co UK

Helmi Q (Finland)

Jencel UK (no 3mm)
THESE "satin" finish 4mm druks are nice

Crystals and Ice UK (only 4mm and 6mm satin finish) 


Lima Beads

Bello Modo


3MM DRUKS
I've mentioned Nirvana Beads many times on this blog but they only sell wholesale to bead shops. I buy their druks locally at Beadoholique. If you'd like to "window shop" their wonderful selection of druks, click HERE. It's really a shame that almost nobody sells druks from Nirvana. Well, I do see their druks quite often on Etsy but they have so many pretty colors that I've never seen available anywhere. Another wholesale site is Starman (click HERE). Again, they have a lot of nice druks that don't seem to be for sale anywhere. Goodness knows why most bead shops only sell boring plain colors when there are so many more interesting druks available from Nirvana and Starman.

3MM DRUKS FROM NIRVANA BEADS
Don't forget that you can also use pearls and real round stone beads in place of druks. I have no trouble finding inexpensive 3mm Chinese glass pearls locally at Beads One and they also sell a few nice stone beads in 3mm. They have pearls in traditional white and ivory but they also have them in a wide range of other colors. They also sell glass pearls in their online shop HERE.

3MM PEARLS
3MM ROUND STONE BEADS
Metal beads are also a nice option. Hobby Lobby has some 3mm metal beads in bronze and copper and they often have them 50% off.
3MM ROUND METAL BEADS

Saturday, August 9, 2014

Lovely Lace Bracelet - More Samples

I've been working on the "Lovely Lace Bracelet" tutorial all day today and it should be ready to post in the next day or two. In the meantime, here are some more color ideas and bead options that I tried last night:

 
I tried three different things with this one. All three have 8/0 seed beads in the lace edging instead of 3mm druks. I know that it's not easy to find 3mm druks so it's good to know that there's a good alternative. 8/0 seed beads work very well. I used 3mm druks in the connector motifs on all but sample #3. For #3 I used 8/0 seed beads as Teejay's tutorial suggests. Again, they're a good alternative but I think I prefer the look of druks. Using druks spreads the motifs out a little wider too. With 8/0 seed bead connectors, the motifs are a little taller and more narrow.

One other thing that I tried with samples #2 and #3 was to use 4mm druks in the centers. As you can see, they work just fine. Since 4mm druks are much easier to come by, this is nice to know. The only adjustment that I needed make was to add four extra 15/0 seed beads to the ring of beads that circle around the center druks. So, you will pick up three seed beads for each of the four sections instead of just two. You'll see what I'm talking about when you read the tutorial later.

Of these three samples, my favorite is #1 and I plan to make myself a bracelet like that but I will use bronze druks in the edging instead of 8/0 seed beads.


SAMPLE #1:

  • 15/0 seed beads Miyuki "Dark Bronze" (15-457D)
  • 11/0 seed beads Miyuki "Dark Bronze" (11-457D)
  • 8/0 seed beads Miyuki "Dark Bronze" (8-457D)
  • 3mm druks "Champagne" (Nirvana Beads)
  • 3mm druks "Bronze Antique" (Nirvana Beads)

SAMPLE #2:

  • 15/0 seed beads Miyuki "Dark Bronze" (15-457D)
  • 11/0 seed beads Miyuki "Dark Bronze" (11-457D)
  • 8/0 seed beads Miyuki "Dark Bronze" (8-457D)
  • 4mm druks "Siam Matte"
  • 3mm druks "Jet Matte"

SAMPLE #3:

  • 15/0 seed beads Miyuki "Dark Bronze" (15-457D)
  • 11/0 seed beads Miyuki "Dark Bronze" (11-457D)
  • 8/0 seed beads Miyuki "Dark Bronze" (8-457D)
  • 4mm druks "Siam Matte"
  • 8/0 seed beads Miyuki "Caramel Ceylon" (8-593)

I'm not all that keen on this one but I wanted to see if the pattern would work with metallic matte beads. It does work fine but the colors are a little too dark. Again, I used 8/0 seed beads in the lace edging because I have more color options that way. For most colors of my "metal" seed beads, I have all three sizes; 15/0, 11/0 and 8/0 but I only have a few druk colors that match my metallic seed beads. Of course I could use a contrasting druk color on the edging but I'm not sure if I'd like the look of that.

SAMPLE #4:

  • 15/0 seed beads Miyuki "Brown Bronze Matte" (15-457P)
  • 11/0 seed beads Miyuki "Brown Bronze Matte" (11-457P)
  • 8/0 seed beads Miyuki "Brown Bronze Matte" (8-457P)
  • 8/0 seed beads Miyuki Hybrid Picasso "Transparent Flame Red" (4503)
  • 3mm druks "Sky Blue Picasso"

Sample #5 has 8/0 seed beads in the edging and also 8/0 seed beads in the connectors. It's not bad but I don't think it looks as pretty as with druks.

SAMPLE #5:

  • 15/0 seed beads Miyuki Duracoat Galvanized "Pewter" (D4222)
  • 11/0 seed beads Miyuki Duracoat Galvanized "Pewter" (D4222)
  • 8/0 seed beads Miyuki Duracoat Galvanized "Pewter" (D4222)
  • 8/0 seed beads Toho "Silver Lined Milky Nutmeg" (8-2114)
  • 3mm druks "Opaque Amethyst Luster"

I love this combination of colors and beads and will probably make myself a bracelet like this one. I used the same druks as in sample #5 but put them in the connectors instead of in the centers. I used ivory pearls for the centers. I think that using druks in the connector motifs gives the bracelet a smoother, rounder look.

SAMPLE #6:

  • 15/0 seed beads Miyuki Duracoat Galvanized "Pewter" (D4222)
  • 11/0 seed beads Miyuki Duracoat Galvanized "Pewter" (D4222)
  • 8/0 seed beads Miyuki Duracoat Galvanized "Pewter" (D4222)
  • 3mm pearls "Ivory" (#10 - Beads One)
  • 3mm druks "Opaque Amethyst Luster"