Friday, July 31, 2015

Peyote Fan Earrings Tip

I mentioned in the tutorial that it may be necessary to take some shortcuts when you reach the point where it's too hard to get your needle through the beads at the top of the earring again. However, I don't tell you exactly where to take the shortcuts because there is no right or wrong way to do it. I just try to find a spot that will allow me to loop back around through the seed beads so that the thread doesn't show. Below is an example showing how I would take a shortcut to weave around and reverse direction to start adding the next row of beads.


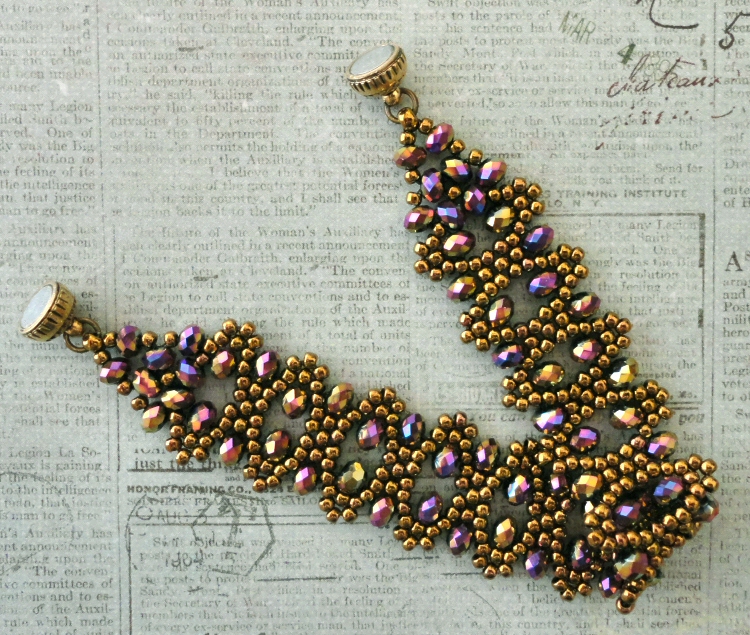
At the stage that you see in the photo, I had just added the second row of pink 8/0 seed beads along the edge and then I had gone up and around through the 8/0 bead, the metal bicone and the other 8/0 bead at the top. Pretend that my thread is coming out of the 8/0 seed bead just after the bicone and I have already gone down through all of those bronze beads on the outer edge just before the pink beads. I had added the second row of pink beads and was just coming up through the two 8/0 bronze beads on the right hand side. Instead of continuing up through the rest of the outer beads and going up around through the top of the earring again, I would come out of the 11/0 bead just above the second 8/0 bronze bead on the outside edge. Then, I would go to the left of that 11/0 bead and down through the 15/0 bead next to it. I then would double back over to the outer row and down through the 8/0 bead just below the 11/0 where I originally came out. From there I can continue on through the second 8/0 bronze bead and then start adding the beads that will make the next row.

I find that if I do this carefully enough, it doesn't matter which side of the earring I take the shortcut from because the thread is well hidden between the beads. Because the beads are stacked like bricks with peyote stitch, it's quite easy to hide the thread in this manner.

So, don't struggle to get your needle through those tight spots at the top because it's not necessary once you've got enough of a foundation of beads to weave around through. I generally don't start taking shortcuts until I've reached about this point in the tutorial. I've never had trouble getting through the top beads every time until I've added at least one row of 8/0 beads when I use 6 pound FireLine. If you've got 4 pound FireLine, you might even be able to go around the top beads a few more times but there's no sense in doing that when taking a shortcut is easier and saves thread too.
 

Click HERE to get the free Peyote Fan Earrings pattern. I will also add this tip to that page so you can easily find it again later. You can just click the link to the pattern from the side menu of my blog under Free Beading Patterns.

Thursday, July 30, 2015

Peyote Fan Earrings - Light Amethyst & Pewter


PEYOTE FAN EARRINGS
  • 15/0 seed beads Miyuki "Duracoat Galvanized Pewter" (D4222)
  • 11/0 seed beads Miyuki "Duracoat Galvanized Pewter" (D4222)
  • 8/0 seed beads Miyuki "Duracoat Galvanized Pewter" (D4222)
  • 8/0 seed beads Matsuno "Silver-Lined Matte Amethyst AB" (F639)
  • 4mm druks "Opaque Amethyst Luster"

I made these earrings to go with a "Lovely Lace Bracelet" that I made a while back. I blogged about it HERE. You can download the free "Lovely Lace Bracelet" pattern from THIS post. You can get this free earring pattern from THIS post.

LOVELY LACE BRACELET
 

The purple "rainbow" beads that I used as the accent color on these earrings didn't have a name or number on them but I think I've tracked them down. They look just like the Matsuno "Silver-Lined Matte Amethyst AB" seed beads on Charlene's site. They're about halfway down THIS page. I'm almost positive that they are the same because mine also have square holes just like the ones in the photo on that page. They make perfect accent beads for these earrings because of their straight-sided cylinder shape which seems to be typical of Matsuno beads.

The "Opaque Amethyst Luster" druks might be a little more difficult to find. That's because they came on a strand of assorted colored druks. I got them from Aura Crystals HERE and they're called "Opaque Luster Mix". Red Panda has something similar HERE called "Chalk White Vega Luster" but I think they're a little more pink and probably wouldn't go very well with the purple accent beads that I used. Artbeads also sells the luster mix, HERE.


New druks at Aura Crystals...

While looking up all of the beads for this post, I just happened to notice that Aura Crystals now has druks in 3mm and 6mm. Until this week, they only sold 4mm druks. They don't have a huge color selection of 3mm druks but they do have some of my favorites. They even have the color that I've blogged about before called "Ruby Copper Picasso" which was formerly called "Jet Copper Picasso". You can see them HERE. Be sure to look at the 6mm druks. They've got some beautiful colors that I haven't seen before. Oddly enough, they've got the "Opaque Amethyst Luster" druks in 3mm and 6mm but not in 4mm. I sent them an email yesterday and was told that they will get the "Opaque Amethyst Luster" 4mm druks in soon.
 

Beading Heaven...

I also want to mention that I used some 4 pound FireLine for the first time to make these earrings. I normally use 6 pound FireLine because it's the most commonly used size and the easiest to find. I bought my spool of 4 pound from the only site where I've seen it which was from Charlene's Beads HERE. It was a dream to work with and I had no trouble going around the whole earring to add every row of beads without taking any shortcuts. Perhaps it's just this particular pattern but I also didn't experience any of the horrible tangling that the 6 pound FireLine is prone to do.

I was also using one of my size 12 Tulip needles so I was in beading heaven. After making both earrings, my needle was still only ever so slightly curved. I doubt if I'll ever buy regular beading needles again now that I've used Tulip needles. They're super easy to thread and they don't bend out of shape like regular needles do after only one use. I've been using the same Tulip needle for many weeks now and it still looks almost like new. The size 12 Tulip needles are a little tricky to find, and very expensive, but they are out there if you search for them. If you work with a lot of 15/0 seed beads you'll want to get the size 12's. The size 11 Tulip needles are great if you mostly work with 11/0 seed beads and they're half the price of the 12's and they come with four in a package. The 12's are worth the price though because one needle can last pretty much forever and you get two of them. I bought mine from Lima Beads because they have the best price that I've seen on that size and I also had a 30% off coupon code. I paid $6.58 for a pair of needles. The regular price was $9.40
 

New Beads...

I got the cutest beads the other day from Artbeads. They're like seed beads but they're cube shape. The best part is that they're in one of those pretty "hybrid" colors. They're Toho beads with a Czech coating on them in one of my favorite colors - "Opaque Rose Gold Topaz Luster". They look to be about the size of 11/0 seed beads and I have no idea what I'll do with them yet. Does anyone have an interesting way to use these?

TOHO 1.5mm Cubes - Hybrid Opaque Rose Gold Topaz Luster  (Y184)


Wednesday, July 29, 2015

Bracelet of the Day: Rainbow Bobble Bangle


BOBBLE BANGLE
  • 11/0 seed beads Toho "Antique Bronze" (223)
  • 8/0 seed beads Toho "Antique Bronze" (223)
  • 4mm rondelles "Metallic Rainbow" (Chinese)

Last week I bought a cute summery top for myself in a bold magenta. I rarely buy such bold colors so I found that I didn't have a single bracelet or pair of earrings to go with it. The swatch below is approximately the color of my top:


I searched through my bead stash for something that would work but nothing was quite right except for these rainbow colored iridescent rondelles. Teejay sent them to me either for Christmas or my birthday and they're Chinese beads. Beads One has a similar color but not in 4mm. These were prefect because magenta is the predominant color. But, since they've also got purple, blue and bits of gold on them, I will be able to wear this set with other outfits. This will be a fun bracelet to wear and I love the sparkle.


Deb Roberti's "Bobble Bangles" was the perfect pattern for these beads even though she doesn't mention rondelles as a suitable bead type. Because there is so much going on color-wise with the beads, I wanted a design that was simple and didn't use too many kinds of beads. Bobble Bangles only calls for 4mm round beads and 11/0 seed beads. 


When it came to choose an earring pattern, Nunzia Scalpore's "Easy Earrings" were just the thing. Again, they only have rondelles and seed beads.


EASY EARRINGS
  • 15/0 seed beads Toho "Antique Bronze" (223)
  • 4mm rondelles "Metallic Rainbow" (Chinese)

If you haven't tried Deborah Roberti's "Bobble Bangles" pattern, I highly recommend it. Every one that I've made so far has become one of my favorites to wear. It has a soft, comfortable feel to it and can be made dressy or casual depending on the beads that you use. One that I wear quite often, because it's black and goes with so many outfits, is made with matte black stone beads and you can read about it HERE.


You can buy Deb's bracelet pattern HERE at Around the Beading Table.

You can watch Nunzia's free YouTube tutorial HERE.


UPDATE: I just remembered that I had taken a photo of the clothes I bought last week, including the magenta top. About once a month I go to a used clothing shop and find all kinds of great clothes for very little money. I spent about $32 for all of these tops:


The top that I will wear this bracelet with is the one on the far right. I buy all of my clothes there now and it's so much fun making bracelets and earrings to go with the stuff that I find there.


Monday, July 27, 2015

Video Tutorial: Earrings with Half Tilas


  • 15/0 seed beads Miyuki "Dark Bronze" (457D)
  • 11/0 seed beads Miyuki "Dark Bronze" (457D)
  • 8/0 seed beads Miyuki "Dark Bronze" (457D)
  • Half Tila beads "Metallic Matte Khaki Iris" (TLH-2035)

Yesterday I watched Cris LavoriDiFata's free YouTube tutorial which you can watch HERE. I'm always on the lookout for ways to use Tila and Half Tila beads and I thought these were really cute. Although the video is in Italian, I didn't have any trouble following along. She lists the beads you'll need near the beginning of the video and you can see above that you'll need three sizes of seed beads and some Half Tila beads.

I ran into a problem while making sample earrings. No matter what I tried, my earrings kept coming out warped. After making numerous samples, I eventually came up with a method that does work but it alters the design slightly. The Half Tilas around the outer edge of Cris's earrings sort of flare out and they don't so much with my version. I wish I knew what her secret is because I think I've tried everything. At first I thought maybe it had to do with Miyuki seed beads vs Toho seed beads but both kinds make warped earrings. My tweaked method works with both kinds.

Below are a couple of screenshots of Cris's earrings from the video so you can see how nice and flat hers look:


Below are some photos of various things that I tried without success.

 
You can't really see in the photo below how badly the earring on the far left is warped. I used my tweak on the other two but I wasn't happy with the loops at the top. I eventually settled for making a loop to hang the earring wire on instead of attaching it to a jump ring.

 
Here is a successful earring motif made with my method:

 
Other than the loop at the top, the only thing that I had to change was the step where she adds the seed beads between the pairs of Half Tilas around the outer edge of the earring. She uses a 15/0, 11/0 and 15/0 between each pair of Half Tilas and I omit the 11/0 seed bead. That removes just enough beads to allow the motif to stay nice and flat. I was afraid that this tweak might not work with Toho beads but it works just fine. Below is a photo showing two sample made with Toho seed beads. I made the one on the left as directed in the video and it's a wonky mess. Besides warping like a potato chip, the shape is all wrong. I made the one on the right with my method and it came out just right.


If anyone has successfully made these earring according to the video, I'd love to hear how you did it. I like my earrings but I would like them even better if the Half Tilas were flared like they're supposed to be.


Sunday, July 26, 2015

Bracelet of the Day: Dragonfly Bangle - Copper & Teal


DRAGONFLY BANGLE
  • 11/0 seed beads Miyuki "Metallic Chocolate" (461)
  • SuperDuo beads "Matte Dark Bronze"
  • MiniDuo beads "Jet Bronze"
  • 4mm fire polished beads "Copper Teal"
  • Rulla beads "Chocolate Bronze"

I like this color better than the sample that I posted yesterday. I added different clasp loops than the pattern instructs but the rest of the bracelet was made according to the pattern. You can download Deborah Roberti's free pattern HERE.


Saturday, July 25, 2015

Playing with my beads...MiniDuo experiments

Four colors of the new MiniDuo beads arrived in the mail a few days ago but they're not very exciting colors. Most of the good colors won't be available until August but I wanted to give them a try now. The colors that I got are "Crystal Gold Luster", "Jet Red Luster" (which is very dark metallic green), Jet Hematite (very dark metallic blue) and "Jet Bronze" (very dark copper).

The first thing that I tried with them was Deborah Roberti's free "Dragonfly Bangles" pattern which you can download HERE. This pattern was designed to work with MiniDuos. It was a challenge to find a combination of all the different types of beads called for that would appeal to me with only those four MiniDuo colors to work with. I decided to play it safe and use the bronze MiniDuos since they match the dark bronze seed beads that I use most of the time. Below is the sample that I made:

DRAGONFLY BANGLES

  • 11/0 seed beads Miyuki "Dark Bronze" (457D)
  • SuperDuo beads "Vega on Jet"
  • MiniDuo beads "Crystal Gold Luster"
  • 4mm fire polished beads "Rosaline Moon Dust"
  • Rulla beads "Opaque Gold Smoky Topaz Luster"

I'm not sure yet if I'll make a bracelet like the sample. I've got another color combination that I'd like to try first and see if I like it better.

For my next experiments, I wanted to try mini versions of some of my favorite patterns. I wanted to see if the MiniDuos would work as a replacement for regular size SuperDuo beads when scaling down the sizes of all of the other beads. I looked through my pattern stash for anything that called for size 11/0 or larger seed beads, SuperDuos and no other kinds of accent beads in a size smaller than 4mm. My plan was to swap the SuperDuos with MiniDuos, 11/0 seed beads with 15/0 beads and any 4mm fire polished or druks beads with 3mm beads. This worked great with all four of the patterns that I tried. For a couple of them I had to adjust the number of seed beads in some spots but I sometimes have to do that with those patterns anyway when I make them the original size.

For each of the examples below, I made a normal size sample and a "mini" sample using nearly the same colors. For some of them I did have the exact colors in both sizes and for others I just chose colors that were similar. After making all of these samples, I'm thinking that scaling down the bead sizes doesn't always look right. I'm a bit fussy about the use of 15/0 seed beads in some of the designs. They look fine in three of the patterns that I tried but I'm not crazy about the look of them in the "Wave of Love Earring" sample. For some reason I think that they look too thin and delicate for the design. The beads all fit just fine in the smaller sizes but I just don't care for the way they look. I do like the smaller size earring though so maybe I'll give the pattern another try with seed beads in a different color. I'll try to find a color that doesn't appear as such a distinct outline around the edge of the earring.


WAVE OF LOVE EARRINGS 

Regular size:
  • 11/0 seed beads Miyuki "Dark Bronze" (457D)
  • SuperDuo beads "Jet Copper"
  • SuperDuo beads "Crystal Gold Luster"
Mini size:
  • 15/0 seed beads Miyuki "Dark Bronze" (457D)
  • MiniDuo beads "Crystal Gold Luster"
  • MiniDuo beads "Jet Bronze"

You can get the free pattern HERE. Click on the word "wavemotif" to get the PDF file.

 
MAYA EARRINGS 
Regular size:
  • 11/0 seed beads Miyuki "Dark Bronze" (457D)
  • SuperDuo beads "Crystal Gold Luster"
  • SuperDuo beads "Jet Red Luster"
Mini size:
  • 15/0 seed beads Miyuki "Dark Bronze" (457D)
  • MiniDuo beads "Crystal Gold Luster"
  • MiniDuo beads "Jet Red Luster"

You can buy this pattern at Around the Beading Table HERE. Deb also has a bracelet pattern, HERE, which has the same motif. I'm pretty sure that it would be possible to make a mini version of the bracelet. I do like the fine seed bead netting on this example. I suggest using Miyuki seed beads for the mini version of this motif if you want to get smooth, even netting. Toho 15/0 seed beads are much too irregular and angular to use for something like this where neatness is crucial. Toho 11/0 beads would be fine for the full size version. They do a very good job making that size. They're just a bit larger than Miyuki's 11/0 seed beads.


HARMONY BANDS 

Regular size:
  • 11/0 seed beads Miyuki "Dark Bronze" (457D)
  • SuperDuo beads "Crystal Gold Luster"
  • SuperDuo beads "Jet Hematite"
Mini size:
  • 15/0 seed beads Miyuki "Dark Bronze" (457D)
  • MiniDuo beads "Crystal Gold Luster"
  • MiniDuo beads "Jet Hematite"

This pattern is also from Deb Roberti and you can buy it HERE. I really like the width of the original size bracelet so I probably won't make a mini version. I only wanted to see if it would work.


INDIA BRACELET 

Regular size:
  • 11/0 seed beads Miyuki "Dark Bronze" (457D)
  • SuperDuo beads "Crystal Gold Luster"
  • SuperDuo beads "Jet Red Luster"
  • 4mm druks "Bronze"
  • 4mm druks "Jet Black"
  • 4mm fire polished beads "Pink Coral Moon Dust"
Mini size:
  • 15/0 seed beads Miyuki "Dark Bronze" (457D)
  • 8/0 seed beads Miyuki "Dark Bronze" (457D)
  • MiniDuo beads "Crystal Gold Luster"
  • MiniDuo beads "Jet Red Luster"
  • 3mm druks "Jet"
  • 3mm fire polished beads "Polychrome Copper Rose"

This is one of my favorite patterns and I really wanted to see if I could make a narrower version of it. You can buy the pattern by Perl'agogo on DaWanda HERE. As far as I know, there is only a French version of the pattern. I don't actually have a copy because I figured out how to make it by looking at the photos. I was pleased to find that this bracelet works very well with the MiniDuos. I only wish that I had some other colors to play with an but I'm sure that it won't be long before I do. As soon as they're available I'll buy them in some of my favorite colors.


Thursday, July 23, 2015

Bracelet of the Day: Vivian's Bracelet - Purple Velvet

VIVIAN'S BRACELET
  • 11/0 seed beads Toho "Antique Bronze" (223)
  • 8/0 seed beads Toho "Antique Bronze" (223)
  • Silky beads "Purple Velvet Matte"
  • SuperDuo beads "Pastel Bordeaux"

I finished the birthday beading a couple days ago and managed to find enough time to make today's bracelet. However, I didn't have a chance to take photos of it until today. I spent the rest of today working on designing my Dad's birthday card and printed it. I've got one more birthday card to make as well as some little gift boxes to put the beaded items in. I found a cute little box template that's just the right size to hold a bracelet or a pair of earrings or two. I found the template online HERE. Now I need to choose some pretty floral designs to print on the boxes. I should work on those today but I'm itching to try out the new MiniDuos that came in the mail yesterday. I ordered four colors from Aria Design Studio and they're all metallics.

Vivian's bracelet turned out very nice but I did have some trouble getting the length right. I thought for sure that 12 Silkies would be enough for my size but the beadwork shrunk up a lot more than I expected. I had to extend the length with eight jump rings. I also found that the bracelet stitching comes out quite a bit looser in an actual bracelet vs the small samples that I made the other day so it's a much softer bracelet than I thought it would be. No matter how hard I tried, I kept ending up with too much slack in my thread as I added to the initial string of beads. That's partly why it was so hard to judge the length. Until I started adding beads to the base of the bracelet, it seemed very long because of all the space between the beads. Thankfully, the thread did all get pulled up and hidden when the outer rows of beads were added. Now that I've made my first "Vivian" bracelet I know that I should use thirteen Silky beads to make a 6-inch bracelet for myself and probably fourteen Silkies if I use Miyuki seed beads. I probably will stick with Toho beads though because they just work better than Miyuki seed beads for this pattern.

You can read more about this pattern in my previous post HERE.


Sunday, July 19, 2015

Playing with my beads...Vivian's Bracelet

I should be working on birthday bracelets but I've been itching to figure out this pattern ever since I ran across it on Pinterest the other day. I've contacted Vivian Rodriguez to see if there is a pattern available but I haven't heard back from her yet. I couldn't stand to wait any longer and decided to give it a go by looking at her photo. If I hear of a pattern for sale, I'll post an update.

UPDATE: I've heard back from Vivian. This is her own design and she hasn't made a pattern.
 

Here is Vivian's original photo from her Pinterest board which you can view HERE:

HERE is the link to her Pinterest board where she posted her photo.

Because the ends of her bracelet aren't visible in the photo, I had no idea how she finished them off. Once I came up with a way to attach a clasp, that helped me see the best path to take around the Silky beads. I was determined not to have any threads going around the sides of the Silkies where they would be visible and I did figure out a way to avoid that by adding the clasp loops right at the start.

Another thing that took some trial-and-error was deciding when to pop out the 8/0 seed beads in the netting along the sides of the bracelet. I thought it might save time and thread to do that as I went along but that produced horrible results, at least with Miyuki seed beads. I haven't tried that method with Toho beads and I made my first samples with Miyuki beads. Once I'd worked out how to make the pattern, I gave it a try with Toho beads and they actually work much better than Miyuki because they're larger. With Miyuki seed beads, the stitching is a little bit dimensional. With Toho beads, the bracelet comes out nice and flat. Also, my Miyuki sample (the pink one below) is quite a bit shorter than the Toho sample (the purple one below). That will be a factor to consider when judging how long to make the bracelet. With either brand of beads, the stitching does shrink up some as you add more beads.

I like the width of this bracelet. It's not too skinny and not too wide. My samples came out about 5/8 inch wide. The bracelet is somewhat flexible with the Miyuki version being slightly stiffer than the Toho version. It has the feel of a watch band.

While I wait to hear if there's a pattern available, here are my samples to whet your appetite for another Silky bead idea:


MIYUKI SAMPLE (PINK):
  • 11/0 seed beads Miyuki "Dark Bronze" (457D)
  • 8/0 seed beads Miyuki "Dark Bronze" (457D)
  • Silky beads "Alabaster Red Luster"
  • SuperDuo beads "Red Luster"

TOHO SAMPLE (PURPLE):

  • 11/0 seed beads Toho "Antique Bronze" (223)
  • 8/0 seed beads Toho "Antique Bronze" (223)
  • Silky beads "Purple Velvet Matte"
  • SuperDuo beads "Pastel Bordeaux"


Saturday, July 18, 2015

Bracelet of the Day: Silver Silky Deco Chain


SILKY DECO CHAIN
  • 11/0 seed beads Miyuki "Full Labrador" (CZ131-27000)
  • 8/0 seed beads Miyuki "Full Labrador" (CZ131-27000)
  • Silky beads "Crystal Full Labrador"
  • 3mm rondelles "Crystal Silver - #C41" (Beads One)

I bought the pretty Art Deco earring charms below at Hobby Lobby a while back but I didn't have a silver bracelet to wear with them. Recently I bought an assortment of beads in "Full Labrador" silver which is very close to the same shade of silver as my earrings. I have Silky beads, SuperDuos, 3mm druks, 11/0 and 8/0 seed beads in Full Labrador. I gathered up all of these beads as well as some crystals that looked a little like diamonds and set out to make a bracelet with them.


It was a bit of a challenge finding a pattern to use because I didn't have any 15/0 seed beads in that silver color. I settled on my "Silky Deco Chain" bracelet because it only calls for 11/0 and 8/0 seed beads and it also has Silky beads. To add a bit of diamond-like sparkle, I replaced some of the 8/0 seed beads with tiny rondelles that have a nice sparkle. Although the bracelet design isn't as intricate as the earrings, I think that they will go together well enough. It's not something that I'd wear with an evening gown (as if I'd ever wear such a thing), but it will be a fun set to wear for every day.

After making this bracelet, I did get some of these silver seed beads in size 15/0 so I might make something a little more elaborate to go with my earrings sometime. Red Panda has all three sizes of "Crystal Full Labrador" seed beads:


15/0 seed beads
11/0 seed beads
8/0 seed beads

You can download the free bracelet pattern from THIS post.


Last night Deb Roberti posted another new bracelet pattern for MiniDuo beads. You can buy the "Infinity Bracelet" pattern HERE

INFINITY BRACELET BY DEBORAH ROBERTI

I might not post anything for a little while. I need to work on some bracelets and earrings for a birthday present and there are other non-beading things coming up that will cut into my beading time over the next week or so.


Friday, July 17, 2015

Bracelet of the Day: Cindy Bracelet - Rosaline Picasso

CINDY BRACELET
  • 11/0 seed beads Miyuki "Light Bronze" (457L)
  • 8/0 seed beads Miyuki "Light Bronze" (457L)
  • 4mm druks "Gold & Smoky Topaz Luster"
  • Silky beads "Rosaline Picasso"

Once again, the black thread doesn't show through these transparent Silky beads. They're called "Rosaline" but they're not pink at all. They're a light amber which goes very well with the smoky topaz druks.

Read more about this bracelet pattern, HERE.


In case you haven't seen it yet, Deborah Roberti has a new free "Dragonfly Bangles" pattern which uses the new MiniDuo beads. You can download the pattern from Around the Beading Table, HERE. I just ordered a few colors of MiniDuos yesterday from Aria Design Studio on Etsy so it will be a few days before I can try them out. It's funny because I remember the first time I ever saw a regular SuperDuo bead, I was shocked to see how tiny they were in real life. It will be interesting to see how the mini version looks.

DRAGONFLY BANGLES